🎨 Unleash Your Shotgun's Style!
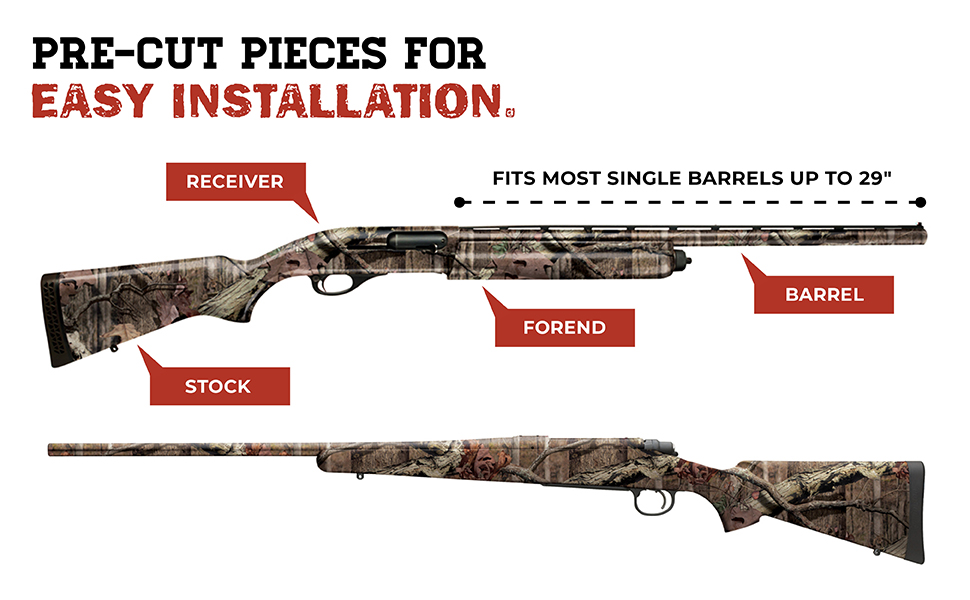
The Mossy OakGraphics 14004 Break-Up Infinity Camouflage Gun Skin Kit is a high-quality, easy-to-install vinyl wrap designed for shotguns. Made from durable 3M cast vinyl, it offers a matte finish that resists fading for up to five years. The kit includes pre-cut pieces for a perfect fit and can be removed without leaving adhesive residue, making it a versatile choice for firearm enthusiasts.


| Manufacturer | Mossy Oak Graphics |
| Brand | Mossy Oak Graphics |
| Model | 14004-BI |
| Item Weight | 4.8 ounces |
| Product Dimensions | 7.8 x 7 x 1.5 inches |
| Country of Origin | USA |
| Item model number | 14004-BI |
| Manufacturer Part Number | 14004-BI |
| OEM Part Number | 14004-BI |
| Special Features | Waterproof |
W**Q
Make your weapon great again!
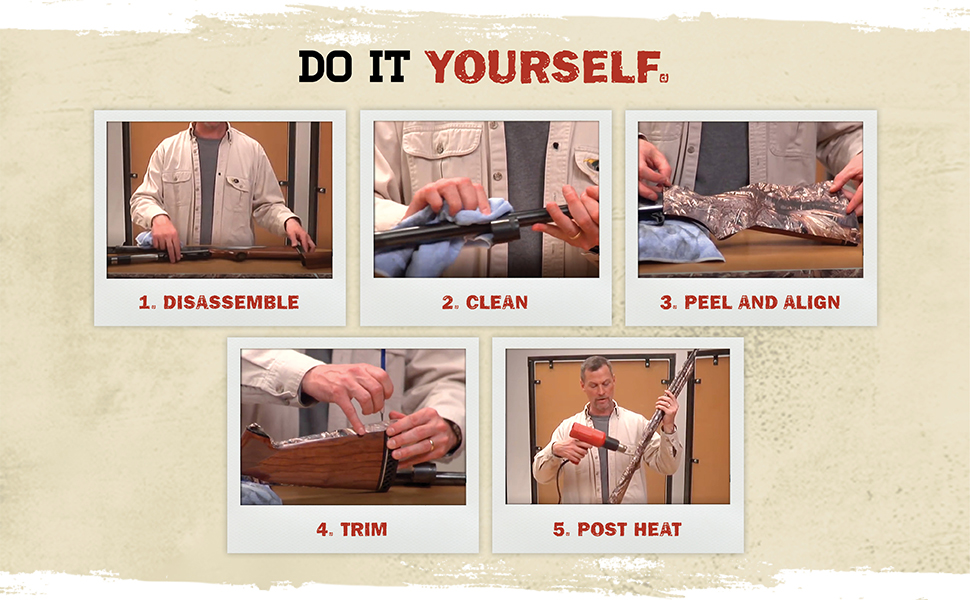
For the most part, it's easy to install, taking me an hour, and the video tutorial on the website is invaluable. Took a 40-year-old gun and made it look new. Great graphics, and it has held up well through hunting season. Provides an extra layer of protection as well. Guys, though I bought a new gun, an inexpensive solution to make your weapon great again!
J**S
Great product
Easy to apply and looks great
J**N
Mossy Oak BU Infinity Graphics - Shotgun Kit
Order arrived on time. I installed this graphics kit in my Winchester 1300 Black Shadow. I must say that I'm pretty impressed given this kit was just over $20 and on prime. The BU Infinity graphics are very detailed and fine. The vinyl feels smooth to the touch and easily molds to the gun. Keep in mind that this is not going to give you the same quality as you get from dipping your shotgun, but hey, it's pretty darn awesome for the $.The installation was relatively simple. However the pieces are not specific to one brand of shotgun, therefore it takes some tweeking in order to get a snug fit. The buttstock gave me a little trouble, but I used some extra material and made it work.I would have given 5 stars if there were better installation instructions. The box points you to a rather non-detailed YouTube video that is very generic. With a little common sense you can fugue it out though. Just be sure to take your time and work the vinyl onto the gun slowly and with pressure. Clean the razor blade every few cuts with rubbing alcohol to remove the adhesive. It makes for a MUCH better cut.I would recommend this product to some looking to put a fresh face one an older shotgun with some blemishes or to someone who wants a nice looking camo shotgun minus the hefty price tag. I'm the ladder of the two.
C**D
Easy to apply
Great product and easy to apply. Looks great
E**E
First time using Camo Gun Wrap, and it came out great!
Great Product, easy to use. My gun came out great, My first time to camo my gun but should be easier next time now that I've done it once. The pic is as I was working on it, the fore stock is not done yet.
H**R
Really impressed with this wrap. Looks like a new gun!
I bought this to wrap my Beretta AL390. I watched the instructional videos on YouTube before purchasing to get an idea of how difficult it would be to wrap my gun. I went into this knowing it was going to take some time, possibly an hour or two. I started with the stock and right away knew this was going to be a two hour project. It's not that it's difficult to wrap the gun or work with the material, it just takes time lining things up and working the material around the edges, and at the same time making sure there are no bubbles or creases. I used a heat gun and that really helped. I don't think it would have been possible without the heat gun (or a hair dryer). A hair dryer should also work as it should get hot enough to warm up the material.The videos mention you can easily adjust the wrap if you need to. I found this to be true, especially on the buttstock where it took a few attempts to line things up properly for fitment. I was worried that once the wrap stuck to the stock it would be difficult to remove to adjust but that was not the case. Apply a little heat to it and it pulled right off. I did use scissors to trim a few pieces and a box knife for trimming along the lines.I went into this with low expectations thinking one little mistake on my end would ruin the project or material, but honestly it was a pretty easy job and your chances of messing up a low. You still need to take your time, especially when cutting. Do not rush, be patient, and you will transform your gun. There might be some people out there that can wrap their gun in under an hour, but plan for about 2 hours. The finished product looks amazing and i'm so happy I decided to give this a try. I was thinking about purchasing a new shotgun that comes from the factory with camo, but this saved me a lot of money and looks just as good.
B**G
Great wrap
Worked great for my Mossberg 500
C**O
Awesome product and camo pattern, but has a few cons.
This product is a PAIN to handle and install. I believe after several uses a person may become very efficient with the wrap, but that means to me it is not as simple as advertised. I'll leave my very honest opinion and insight to hopefully help others.Once the pain of installation is done this product literally transforms your gun! I am very pleased with how it looks on my bird gun! My buddies thought I bought a new shotgun. Almost all of the air bubbles resided after the install and the only creases were where the material over lapped. You do lose some grip one the gun because of the wrap, not enough to complain about. The reason I could not give it a 5 star rating was due to the materials inability to withstand the heat of the hot gun after the install. I went to a pigeon shoot and was really proud of my gun. I shot often and well that day. After 5 boxes of shells the gun gets hot [Duh]. Much to my dismay, the wrap began to come "un-glued" to the barrel of the gun around the muzzle, foregrip, and the vented rib. I tried to ignore it but when a buddy used it and brought it back pointing out the flaw I was over it. If you put this on a gun and you don't plan on running to the point of getting hot you'll be fine. But to me, its on a gun and I had hoped (not using common since) that it would hold up to my idea of typical use.1st, the instructions tell you to clean all surfaces of oil before you apply... and they mean it. It seems taboo to do this to your firearm, but it is a must. Use your favorite oil cleaner as long as its not abrasive to any of the surfaces. If there is any oil, or even residue, it will effect the adhesive.2nd, leave yourself at least 3 hours to do this. It is very tedious so take your time if you want it done right.3rd, measure TWICE, cut ONCE. There is a little material to spare and you can use to fill in gaps but it makes this even harder and more time consuming. Also, when making cuts where material overlaps, make your cut a wavy line cute rather than a straight line. This helps the pattern transition and really decreases the visibility of the crease and overlap.4th, HEAT IS YOUR FRIEND!!! Use a hairdryer or heatgun to "warm" the material and surface when applying. This will help you stretch the material into place because you will never be able to make perfect cuts with this stuff. Just don't get crazy with the heating and stretching, it will MELT the material and it will loose its adhesive. When you are all done, hit with more heat and give it some final touches. I did a Ruger 10/22 as well as my 11-87 and had good results by leaving the gun in the hot car all day the next day to help the material set in and memorize its surface.
Trustpilot
2 months ago
1 day ago